Custom Coat of Arms - Commission

It was my pleasure to make this Father's Day gift for a great friend of mine. This Stevens family Coat of Arms (COA) is made on wood, using a wood burning tool. All parts of the piece have been burned and will be lasting there for a long time.

This piece had several different inspirations that brought it to be this finished product. One of the things that I like to do is research...about anything. So when it comes to researching a custom piece like this, my research side comes out not only to make it the best it can be, but also because it would feel wrong not to.

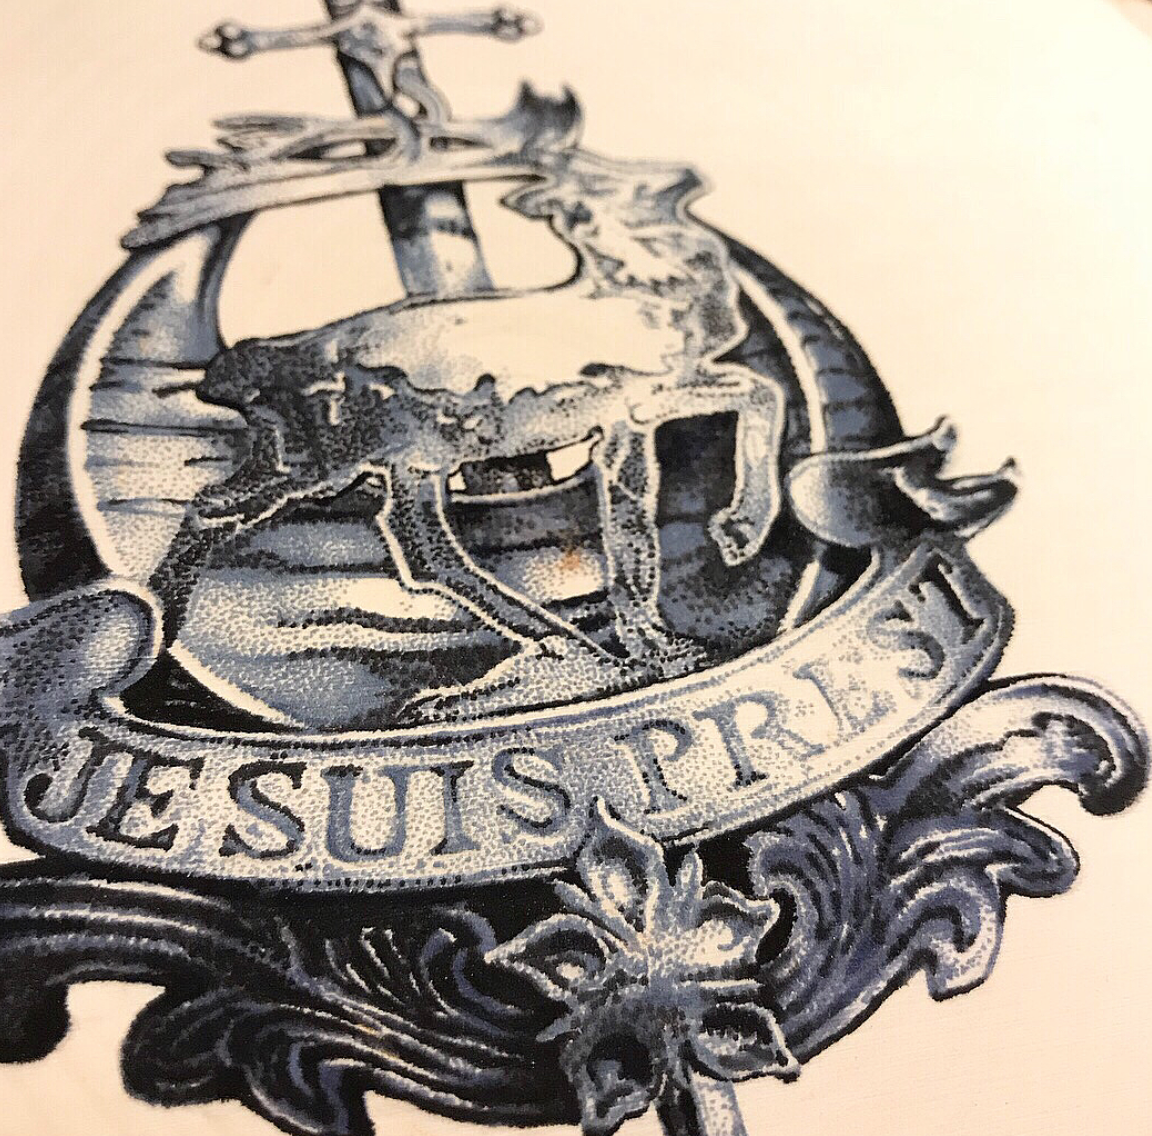
Coat of Arms' in general are both very similar and unique in their own ways. The traditional coat of arms (which is below) has the head a knight above a shield, with feathers or ribbons stemming from the top of the helmet. All of these attributes are displayed below. When seeing hundreds of other interpretations, you will see a variety of different knights, shields and ribbons. The ones I chose looked very interesting and displayed the look that was important for this COA. 

This Stevens family symbols (images on the shield) come from the Scottish family records for this last name. The two 'fleur-de-lis' and 'wreath' would not be interrupted for my design, I wanted them to stay exactly the same as the records would indicate. Other additions are the names of the Stevens children in the middle of the shield and the 'rampant lion' at the top of the piece. One of the first requests was to incorporate the names of the three boys into the design and the lion at the top is the exact same lion symbol used in the Scottish royal flag. 

The wood burning took about 20 hours. The darkest parts actually go the fastest most of the time. When the goal is the heavy burn, you can push down (to a certain degree) and the wood burns quickly. I tried to do a lot of shading in the piece, especially around the feathers. I wanted those pop out of the wood as best they could. Also some of the darkest shading is behind the shield for that same reason. The shield is the main focal point, so making that stand out is priority. The longest parts, of course, are the fine details throughout, being the letters, symbols, knight and shading in and around the feathers.

IMG_1206.JPG

Elephant Mother and Calf - Commission

The latest project was a commissioned piece was some good fiends of mine. The recipient is an elephant lover who asked for a piece of a mother and calf with the main colors of blue and grey. This was a project that was a combination of stippling and shadow techniques. The light blue color is the base of the shadow portions of the elephants. Grey was added using the stippling or pointillism technique in the darker portions of the elephants to add depth and contrast. 

This was a lot of fun to make because it was more of a "play as you go" sort of piece, wherein I was letting the dots materialize as I went. It's always easier in the pointillism technique to start with a little and add more as you go. If I add too much too early, then you can't go backwards, you can only go forwards. My original intentions were to add grey over most of the blue portions of the elephants, but as the piece came together it made sense to only add grey dots to the darkest portions, that way the blue portions would still shine and have duel colors and not just two colors combined. 

IMG_0774.jpg

North American Bison (Part 2)

This North American Bison is completed in a black ink .20mm pen. The entire piece is done in a stippling technique of using all dots to create the illustration. 

The background took the longest to get right in this piece, using all dots, it simply takes a long time to get them all in there. But with it being now completed, the all stippling background really makes the Bison head pop into the foreground. 

Unlike a lot of my other illustrations, this piece was done in all black. In all my other works so far, I have tried to use colors. The great thing about colors is that the ink can almost blend together like paint, then showing the great definition of whatever your illustrating. With using all black ink, the one huge advantage is that I can use a much smaller pen to work with. There is not a 0.20mm sized pen in an assortment of colors out there, except for black. So with the black ink, I can show the small details of the Bisons head with the tiny dots. I think it came out really well!


IMG_0666.jpg
IMG_0667.jpg

North American Bison (Part 1)

This wild bison is a try on the traditional style of stippling. Stippling is using all black ink dots to make the piece. Pointillism is the use of dots with colors, which a lot of what my past pieces have been. Stippling in this piece has been mostly with a .20 mm pen (which is pictured below).

With the extremely small-tipped pen, I am able to get some great detail in showing the intricate parts of the head, while still being able to add the levels of shadows to show depth. 

It's going to be set in an all black background, so still plenty of dots to go! It should be finished real soon.

IMG_0650.jpg
IMG_0644.jpg

Magic Kingdom Medallion (Part 2)

All finished with the Disney's Magic Kingdom Medallion. Prints of this piece will soon be for sale on Etsy. 

This piece was a lot of fun to make using the pointillism style. Since this was meant to look like a real metallic medallion, the light source becomes the most important part of the realistic approach. Showing the light and how comes off the medallion is how it pops off the page. 

The night sky in the background was a change up made halfway though. With the magic of Disney always being a main focal point, I thought the night sky background with beautiful stars would add to the castle in the end. Also, it makes a great piece of work for the child's bedroom or any Disney themed room or wall. 

WDW Castle.jpg

Magic Kingdom Medallion (Part 1)

This project just happened all of a sudden and I just rolled with it. I have a lot of respect for the Disney franchise and always enjoy everything they do as far as movies, theme parks, business, etc. The medallion was an original gold symbol on a Disney photo album that my wife and I got at one of the parks. I decided to use that symbol as the inspiration, but change the colors to various shades of blue. The blue castle is an iconic color scheme, so I thought it fit well for this quick project. 

It's fun trying to make the objects pop off the page with the light source. The smaller the piece, the more challenging it is to use the pointillism technique, but I enjoy the detail that each dot can bring. It makes each dot that much more important than it would be with a much larger piece (see the Sea Turtle below). With the castle portion completed, now to work on the rest if the medallion.

FullSizeRender.jpeg

Buffalo 6

The Buffalo 6 Canvas is a representation of the classic Buffalo Bills logo. So whether you're a Buffalo sports fan or from the Western New York area, this is a wonderful piece to have in your home or workplace. There are FIVE color schemes to choose from. This product is MADE-TO-ORDER, which means each one will be completely original, hand painted by the artist. The color scheme can be made to look like any of the five pictures published below.

Buffalo, NY is my hometown. Being from Buffalo is a very proud thing to all who are from and/or currently live there. Whether it be sports, the people, the city itself or surrounding areas, it truly is a special place to live and grow up.

Each canvas is 12"x16". Together they make 36"x32" piece (six canvas'). The overall specific size can vary depending on how much space (if any) you wish to give between the canvas' once hanged. Canvas' do not come with hanging materials included, but it is very easy to do so with any hanging materials such as tacks or nails. Canvas' are lightweight and can support most hanging materials. Each product will be signed by the artist. 

IMG_0413.png
IMG_0414.png
IMG_0415.png
IMG_0416.png
IMG_0417.png

Sea Turtle (Part 2)

The six canvas Sea Turtle is starting to come together as the finish product is taking shape. Spending a lot of time on the outer parts (fins and head), working on the shell now has been a new challenge. Since the shell has a much different texture than everything else, the challenge has been to show the extremely smooth and thin color shapes and lines give way for the texture. The reward though is seeing the first portion of the shell come together. 

The photos here are the most recent and show a little progression along the way. 

IMG_0589.jpg
IMG_0590.jpg
IMG_3926.jpg

Sea Turtle (Part 1)

The Sea Turtle here is only one of six canvas that will come together. It's a long work in progress! You will be able to see more updates as they come. 

One of the fun reasons why there are six canvases instead of just one large one, is that when you're close up while using pointillism, the dots don't form much of anything. But when you zoom out, your piece starts to come together and the object comes into focus. In the case of multiple canvases, here you can see that just one canvas doesn't show the whole turtle, but when they come together, it shows this colorful sea turtle making its way through the ocean.

Screen Shot 2017-12-10 at 3.06.53 PM.png
Sea Turtle Full Size (in progress 1).png

The Kitchen Collection Trio

Here we have all three pieces of the Kitchen Collection Trio. These fruits were all made separately and were digitally combined here to show all three. The Orange, Grapes and Pineapple were all made using the pointillism technique of using thousands and thousands of small dots that come together. 

When exploring the pointillism form of art, it was cool to see how many different colors that I could use in when making one object. For example, when making the orange, I was able to use 6 or 7 types of pens to help with the shading of three dimensions and show the depth of the orange. When first studying a piece to make, one of my first objectives is to find how many colors I can use to make the dots. There will always be more than at first site. If I just used one orange pen, it wouldn't give the same feel as many shades or orange colors do. 

Screen Shot 2017-12-10 at 3.06.40 PM.png